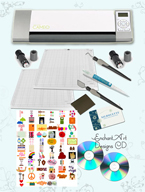
Here is the new Silhouette that will cut up to 12 by 12 inches papers and cardstock.

According to Silhouette’s Web site these are the specifications of the new and bigger Silhouette Cameo:
– True 12″ width cutting area (with the ability cut an actual 12″ rather than a 11.5″ cutting area like other comparable machines). You will be able to adjust the rollers of the machine to cut smaller size papers (9 inches).
– Will include 13″ x 13.5″ mat to provide a 12″ x 12″ cutting area for materials that require a mat
– Ability to cut longer custom lengths for materials with their own adhesive backing
– Optical scanner for “Print & Cut” applications. Silhouette is very accurate with the P&C files.
– Compatible with Silhouette Studio® allowing you to cut fonts and images from your PC or Mac®. Also, looks like Silhouette is coming out with a newer version of the software at the same time of the Cameo release to the public.
– Cuts vinyl, paper, cardstock, fabric, etc just like the Silhouette SD
– The machine uses the same size of blade and sketch pen as the Silhouette SD, so all of your current accessories are compatible. Don’t have to buy new accesories if you already have some for the SD.
– Quieter operation during cutting process. This is good since the smaller Sil. is considered loud for some people.
The Silhouette Cameo will be offered at a suggested retail price of $299.99 and will be available for purchase later this year (projected October 2011); so you will have this machine ready for the holidays.
If you are interested in getting this machine, let me know at glenda@enchantart.com so I can include your name in the pre-order list. Also, if I can get any discount from Silhouette America, I will pass this to my customers.
Have a great day/evening!
Tags: new silhouette cameo
I would like to present you a video explaining how the New Cinch version 2 works. You’ll see some differences from the previous version, which I have and like so much (I’m not planning to upgrade it). But if you don’t have a Cinch, I recommend to get this new version since it can cinch smaller wires than the first version, without any other attachment.
If you are interested in buying the new version, click here for more information. This machines are flying fast from the store; I can see why: the price is better than any other place and people have all the support they need when they buy from Enchant Art. If you have any question, e-mail Glenda at info@enchantart.com
Here is the new video from WRMK:
There are several software applications that allow you to cut using your digital cutter. One of the best is Make the Cut , which has the option to import .svg files and can cut directly to the Silhouette machine from the program. But we have to give the Silhouette Studio a special place too.
Studio is free to download; if you want to download the latest version, you can click here. This is the latest 1.7.0 version of the program. Even if you don’t have your Silhouette or Wishblade yet, you can download the program and play with it.
Now, let’s see what are some of the new or improved features from Studio version 1.7.0:
- The Dashed line option added to the Line Style menu options: Oh! This is so cool! Now you can use a pen (normal, glitter, Silhouette–whichever you have) and instead of cutting, you can sketch the lines on your paper.
- Square endcaps option added in the Line Style menu options for thicker lines: This is useful when you want to actually print and not cut a design with thick lines. The ends of the lines are going to look more square or rounded depending on what you choose.
- “Fill Page” option added to the Replicate menu options: If you choose the Replicate icon, now you will see also, at the bottom of the pane, the option to Fill Page. This means that once you click on the image to select it and then choose the Fill Page option, Silhouette will make enough copies of the original to fill the entire page.
- In My Library, you will find another category called “Pattern”. That will help you to organize the patterns that you can buy from the Silhouette Online Store.
- If you have a design with a pattern applied, you can clear that pattern from the design using the “No Fill” option. This option is the first icon under the Pattern Fill menu.
- In the Fill Color and Line Colors menu, you can find a color picker syringe, this is the second icon in the palette. This works just like many other programs, such as Photoshop. Now you can choose a color from another picture or design and apply that color to another shape. The color picker is very helpful when making print and cut designs and you want to keep uniformity with the colors.
- If you are in a normal mode and double-click your design, the design will change to “Edit Point Mode”. This doesn’t take effect if the design has been grouped. The program won’t allow you to change a grouped design.
- When you choose the Eraser tool, you will see your cursor change to a gray circle that you can move around the areas to be erased. Now you can see the eraser work while you press and keep pressing the mouse in order to remove lines or even color or pattern filling.
- If you have lines or shapes that are not closed, you can click on the last node and drag it towards the first node. They will snap together to create a closed shape. But if you don’t want this to happen, press the Shift key while dragging the node.
- Click on a node to select it and use the arrow keys from your keyboard to move that node to the left, right, up or down.
- This version has improved the handling of DXF and GSD files.
- You can also see more options when you choose the Open “Files of Type” drop-down selection.
- There are other fixes that will allow you to have a better experience using the software. Some you will not see or use, but they are important for the general use of the software.
- Also remember if you create something with the new version and want to share with others, they must have the new version also in order to open and see the contents of the file. All the other designs created before the update will be perfectly usable with the new Studio version.
I recommend that you play with the software and create something nice that you can cut and share.
Happy cutting!
If you want to cut in the Silhouette, Silhouette SD, Craft Robo (Blue or White) or Wishblade directly from Make the Cut software, now it’s easier than ever since you just have to download the plug-in.
Make the Cut is offering the download of the Beta version of the new Silhouette SD Plugin. In order to download it, click here. This link is going to take you to the MTC forum.
You can also watch a video how it works here:
According to the posts in the forum, the plug-in is working well with print and cut projects, but it is still in Beta version, so we expect even more updates, like simulating the Silhouette mat in the screen.
For now, make sure to set up the mat to Landscape in MTC and in the printer.
If you’d like to purchase MTC from Enchant Art, just click here and then send me an e-mail to info@enchantart.com with the order number and we can give you directions on how to get $10 of free digital files from the Enchant Art store (you can choose your images).
Have you seen the new punches on the block? They are the Lucky 8 Punches from We are Memory Keepers.
These punches allow you to make 3 different, gorgeous page border designs with one tool. You can use them as an edge punch or to die-cut a 12 x 12 paper (without a die-cutting machine). WRMK will have different designs, but for now you can choose from 6 different punches to transform your pages into beautiful die-cuts.
The Lucky 8 features:
* 6 great designs (collect them all)
* Corner and border punches combined into one punch
* Easier to use than other border punches
* Stackable for convenient storage
* Ideal for 12×12 paper, but you can perfectly create unique designs with any size paper
* Corner guides for “no-guess” punching
* Dimensions are approximately 7.5 x 7.5 inches
* Punched area is approximately 6 x 2 inches
If you want or “need” these punches, they are avaliable for pre-order now. Click here to pre-order yours. They will be shipping in July.
Watch this video to have a better idea how they work.
Tags: lucky 8 punches
This is the new Press Release from We R Memory Keepers about the Cinch Version 2:
SALT LAKE CITY, Utah (May 9, 2011) We R Memory Keepers announced today a new and improved version of their best-selling book binding tool, The Cinch. The Cinch Version 2 has many great improvements over the original Cinch Book Binding tool which has already become the best-selling book binding tool for the money on the market! The original Cinch took the industry by storm with its revolutionary binding system that allowed user to quickly and easily bind projects of all shapes and sizes.
The Original Cinch gave users everything they wanted from a binding tool: round holes for no-stick page turning and more binding option, pull-out ruler for larger projects, and more. Only We R Memory Keepers could make the best booking binding tool on the market even better!
“We are very excited about our new Cinch! We had great response from the original, but as with most tools we knew we could improve on it and make it even better!” Says Andrew Hiller, Owner of We R Memory Keepers.
The Cinch Version 2 is like its predecessor in that it punches perfectly round holes without measuring, offers customizable punching, projects lay flat while punching, and users can punch any length with up to 20 sheets of copy paper at one time. It also has a convenient storage clap, and a stylish Cinch Carry Bag. At its price point, it simply is the best and easiest to use book binding tool on the market!
What’s new? The Cinch Version 2 has the following new and improved features and benefits:
- New and more accurate cinching bar system
- Now compress binding from .325 to 1.25 inches! (The original requires an adjustment bar for smaller wires.)
- Easy to turn knob at top of cinch bar for selecting wire diameter
- Improved cinch platform with filled-in columns ensuring more circular wires
- Improved inner gear ratio for fully retractable punching every time
- Stronger springs inside for easier punching
- Expanded instructions in 4 languages
- New fun color!
To get your New Cinch version 2 on sale visit the Enchant Art store. If you have any question, let me know and I would be glad to answer it.
Have a wonderful day!
Enchant Art is having a huge Kaisercraft sale with a coupon code offered to the readers of the blog. Any Kaisercraft product qualifies for this offer, even the ones that are already on sale.
The steps are very easy; just visit the Enchant Art store and start adding your products to the Cart. Once you go to check out, enter the Code: kaiser and you will receive 30% off from all the Kaisercraft products available.
This offer is only for the month of May, so if you need pearls, bling, stamps, albums, etc, go and take a look at the store; there is even a Category named Kaisercraft to make things easier for you to find.
Have a happy day!
Tags: discount coupon scrapbooking supplies, kaisercraft coupon
The structure of the piano hinged book is intriguing and since I like experimenting, I decided to learn more about it. If anybody tells you that making this book is super-easy, don’t believe them. It presents its own challenges.
First, I like to make my own version of everything. So I had to create my own template. Then, I had to make sure that everything (covers and inside pages) fit well. And lastly, that the book was easy enough so anybody with a little bit of interest could make it.
Putting all these elements together and after many attempts, I came out with this book:
I used pastel-colored papers, wooden skewers, ribbon and decorative cardstock for the front and back covers.
The first thing was to paint the skewers with gold acrylic paint and some glitter paint. I let them dry. Meanwhile, I worked with the template, making sure I had an even number of notches to go through with the skewers. If anybody is interested in the template, let me know. Otherwise, I’ll explain:
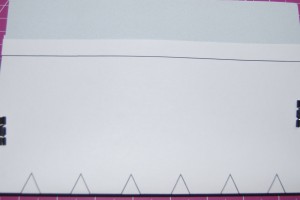
Basically, you will fold your letter size paper in half and using the folded side of the paper, make 3/4′” and 1/2″ marks. Then, cut triangles between the 1/2″ marks. This is the template that you will use to cut all your pages.
After you cut all the pages and covers, you are ready to assemble your book.
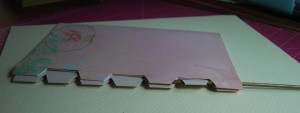
Insert the skewer in the first tab from the cover, then to the second tab of your first paper, third tab of the cover, fourth tab of the paper, fifth tab from cover, sixth from paper and finish with the seventh tab from cover.
Do the same with a third page. Add as many as you need.
Also, instead of using one sheet of paper or cardstock, you can use three or four grouped together. These are called signatures and are more convenient if you need or want more pages.
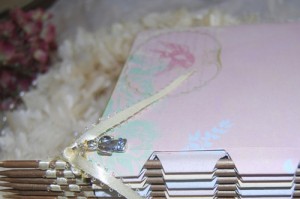
Then, I weaved some ribbon at both endings of the skewers and added an angel charm at the top.
You can see more details of this book here. Any questions, please let me know.
Tags: handmade books, Piano hinged book
Happy ….. Birthday Earth! I’m very happy that we still have beautiful rivers, oceans, mountains, birds, etc. They all remind us of the artistic and many times playful side of its Creator.
If we like the beauty of nature, we should be also be conscious of our impact (good or bad) to our planet. One good thing to do is to recycle. I want to encourage you to do so by posting this free file. You can cut it and make mini-cards or tags to give to children or adults. If you recycle, take pictures of your recycle bin and your family and make a nice layout using the cut-outs. Or use it as a template to paint some T-shirts for the family.
OK. I think I made my point already. Now, to download this file, please click here.
If you want to take a look at the full Earth Day file that I created, click here.
And … keep recycling!
Tags: Recycle free file, silhouette recycle file, svg recycle file
If you have the Cricut machine and the current version of MTC (3.2.1), you can cut with the software. MTC has 30 days to change the product and make it incompatible with the Cricut, so if you are thinking on buying Make the Cut to cut with your Cricut, you have to get it now before those changes occur.
If you are interested in buying the program, you can click here.


