I like to customize my projects as much as possible.
Yes, I love ready-made products because they are beautiful, easy to use and many other reasons that you and I already tell ourselves when we are in a craft store and tempted to buy a product.
But, if you want to create your own rub-on of any thing, such as alphabets, clip art and even photographs, use this very easy method:
- Create or open a design using the software of your preference (even Word can be used.)
- If you are going to print text, make sure that you change to a Mirror image (that is an option for other types of images.)
- Set your printer to print using the setup for best quality.
- Instead of regular paper, use a page protector or transparency sheet, If using a transparency, print on the shiny side. Remember, you want the printing surface very slick, so the ink doesn’t get absorbed by it, but left on the surface.
- Print. Let dry. You can look at it but don’t touch it until well dried. It’s going to take 5 to 10 minutes.
- Now your rub-on is ready to use just like any store bought rub-on. Position the printed side on the desired surface and, using a stick, rub over the design.
- Wonderful! You did it by yourself without using any brain-damaging product or spending much money. And best of all, you can reuse the same page protector for another project.
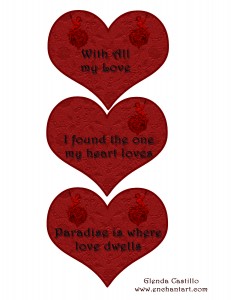
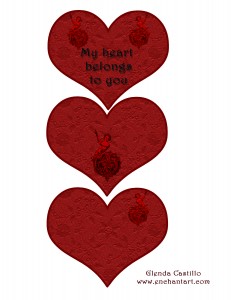
I want to treat you, my blog reader, with some romantic images that I put together using Photoshop and scanning. I hope you like them. They are in JPEG and PDF format. I was going to put them as print and cut files, but I’m very busy adding products to www.enchantart.com. The new laces are beautiful, I have my favorites already.
By the way, you can cut these wonderful hearts and adhere them back to back to create a sturdier mini-book. These images are 300dpi (very high resolution) just in case you want to make them bigger. Any comment, please let me know. Take care.
Click here to get the PDF version.
Click here to get the JPG version.
Tags: free images, jpg, pdf, romantic images
Here is a new video for the eCraft. It was made during the CHA Winter, so it’s pretty new and accurate. I want to point out that they mention the new software which gives you the ability to create your own images. Also, I couldn’t see the chads in the image. Take a look and judge by yourself.
By the way, this is the periwinkle model.
Tags: ecraft craftwell, ecraft video
I was waiting “patiently” for more information about the eCraft since everything was very secretive until the CHA. Today is the last day of the Convention and I have some news for all of you:
- The eCraft can cut grungeboard and chipboard, being tested only with 1mm-thick chipboard. I will be testing it with thicker chipboard as soon as I get it.
- The machine doesn’t use a mat. There are several consequences of not using a mat:
- It leaves tabs/chads to hold the cut piece to the paper. You have to punch your design out by hand. Many people say that the tabs are easy to remove. And you can adjust the size of these tabs, which can make a big difference if you are cutting vinyl.
- That leads to the matter of cutting vinyl, because the eCraft cuts all the way and does not leave the vinyl backing in place, making the reposition of the cut material a little bit harder if your design has words with specific spacing in between.
- The eCraft is going to have 2 different software programs available for purchase— the Basic version and the Pro version.
- The Basic version allows you to open the images that you buy from Craftwell on their SD cards.
- According to Craftwell, the Pro version of the software enables you to create new designs or import SVG images and then set the draw and cut lines.
- The Pro version also allows you to unlock all their 1,000 images and bring them directly into the software, without having to purchase those images.
- Right now, the Pro version software is pricey in my opinion ($300). Craftwell is talking about a middle option, where you can create your own designs without the option of unlocking their designs (which I definetly prefer since I like to create my own designs).
- All iPhone and iTouch applications will be available to use with the eCraft.
I’ll keep you posted with the latest news. If you are planning to buy the eCraft, I suggest waiting for more information.
Tags: ecraft craftwell
I’ve received a question on how to add your own files to My Library in Robo Master. This is a little controversial because when you add too many files to My Library, this is going to run more slowly. Plus, you can access all your non-Silhouette store files through File, Thumbnail Browser. However, I want to answer the question:
- Create or download a .gsd file. If you want to see the thumbnail of the image and not just the name, you need to have a .gif version of the file, making sure the picture is very small (like 100 x 100 pixels)
- Create a copy of the file if you want to keep the original .GSD.
- Right-click on the second file and Rename it with an extension .GST. Right click again on the file and choose Cut.
- Go to C: Program Files, ROBO Master, Templates, right-click in the window and choose Paste. You will see the new file with the extension .GST
- Go to C: Program Files, ROBO Master, QK View, Thumbnail and save the thumbnail version of your image there. Remember, the thumbnail has to be very small.
- Open your ROBO Master, select New file and click on My Library. Your thumbnail should show there.
This is an option that you may like to experiment with. I have all my non-Silhouette store files in a separate location, a Cutting Files folder, where I created sub-folders with all the categories that are significant for me. Even those have sub-folders, in order to keep my files more organized. I hope this helps.
Tags: Adding files to My library in the silhouette, how to put my files in the Library
I hope you enjoy cutting or printing this word book.
Add your own phrases or write a poem.
Tie some ribbons and just let somebody know how important he/she is in your life.
I cut the letters twice. The first time around, I just cut it normally. And the second time, I use the Mirror feature from ROBO Master (right-click on the letter and choose Mirror) and glue the two pieces to make my mini-word book sturdier.
I created this file using Inkscape. Then, I converted it to a GSD file, and I also made it into a PDF just in case you don’t have a digital cutter machine. I made 3 different versions of letter “O” so you can choose the one that you like.
- To download the SVG file, click HERE.
- To download the GSD file, click HERE.
- To get the PDF file, click HERE.
Tags: Free gsd svg file, free pdf, love book
The suspense is killing everybody. We all want to know how much the eCraft will cost. Here are the MSRP price for the first released model of the eCraft. Consider that these are the prices for the 12″x unlimited length of paper. Craftwell is coming out with the 30″ wide machine; the price for that model is not determined but soon we will know.
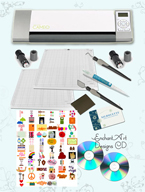
- eCraft basic (colored) model: MSRP $349.99 includes 1 SD Image card, 2 Black pens, 5 Blades, Paper Tray, Roller Attachment, eCraftshop Professional Design Software (download) and the USB Cable
- eCraft Deluxe (black) model: MSRP ? includes 2 SD Image cards
- eCraft Professional (silver) model: MSRP ? includes 2 SD Image cards
The software for the eCraft is the eCraftShop design software. This will be included with the eCraft. The software will be released by August and you will be downloading it once you register your machine. The SD cards are going to be loaded with hundreds of images that you can re-size and cut using different materials.
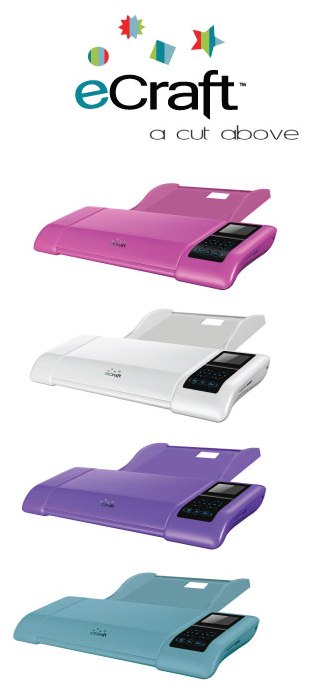
Here are the colors, choose one…
Tags: ecraft craftwell
We are all anxious to touch and try out the new eCraft machine. It will be soon when I can give you details about whether it works with almost anything. All the questions will be answered. Will it cut chipboard? What about fabric? I don’t know yet; I have to try it myself. But I know some very interesting facts:
- The machine will be loaded with a built-in roller. This roller will allow you to print/cut any design 12″ wide to any length of paper. How cool is that???
- They are working on amazing colors for the eCraft machine itself. You can choose from many according to your decoration. You know which is the new color…..periwinkle!!! Periwinkle will replace the green color. I like the green too.
- I’ve heard that Craftwell is coming out with another version of the eCraft that will cut 30″ wide and of course any length. Interesting, very interesting.
Anyways, stay tuned until I come back with more about the eCraft.
Tags: craftwell, digital cutting machine, eCraft
If you create or find an .svg file (default Inkscape file format), you can cut it directly from Inkscape. You don’t have to convert the file to any other digital cutter format. This is very convenient since the cutting is going to be smoother when you do it directly from the program where the file was originally made. When you export a file, it will export but with additional nodes in it, making the file difficult to cut unless you clean those nodes. If you want to cut directly from Inkscape, follow these steps:
- Open the file in Inkscape if it’s not open yet. Make sure the image has a Stroke line. I prefer to make mine black to make things easier.
- Using the Select tool, select all the images you want to cut.
- Click on File, Print.
On the Print window, click on Graphtec Craft ROBO. Click on the Preferences button, the Printing Preferences window will open.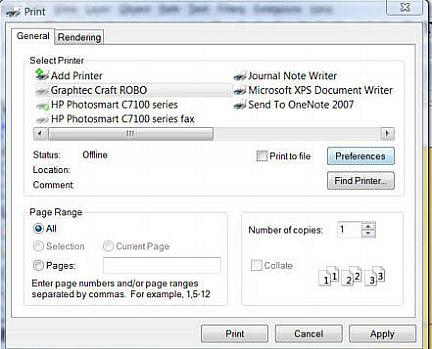
On the Printing Preferences, for Paper Size: use the ISO A4. Now, click on the box next to Use Carrier Sheet to insert a check mark. On Margins: select Expanded. Make sure the Design Orientation is the same as to the page orientation of your screen. All these are in the Basic Setup tab.
Now, click on the other tab from the same window; that is Cutline Settings tab. Click on Modify Color if your color line is not selected already. Click on the Controller button. The Craft ROBO Controller window will open.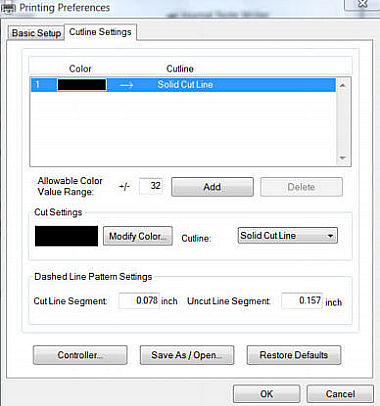
On the Craft ROBO Controller window, select the Media Type and adjust the Speed and Thickness according to the paper or cardstock that you are going to cut. Click on the Close button.
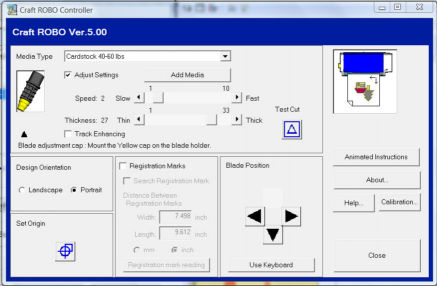
Click OK on the Printing Preferences window. It will close.
Click on Print on the Print window.
A small window will appear prompting you to click OK to start cutting. Click OK.
Immediately you will see the Silhouette cutting from Inkscape.
I hope you can give it a try since it’s almost like using a regular printer and you can have great results. I did this using the latest version of Inkscape, which you can download it free at www.inkscape.org.
Tags: how to print from inkscape to the silhouette, Inkscape tutorial, using silhouette with inkscape
These methods are good for any surface and very useful if you want to give your project an old world look.
CRACKLING USING ONE COLOR PAINT:
- Paint your project with the color of your choice. Let it dry.
- Using a soft brush, apply the crackel medium. Follow the directions for the one that you have. Let it dry.
- Take a soft rag and dip a little bit in brown paint like Raw Sienna or any other similar color. Rub over the surface of your project to make the cracks look darker.
CRACKLING USING TWO COLOR PAINTS:
- Paint your project with the color of your choice. Let it dry.
- Using a soft brush apply the crackel medium. Follow the directions for the one that you have. Let it dry.
- Now paint the surface with a different color. You can use a brush or a sponge. I prefer the brush since I have more control over the strokes. Remember to go only once over the surface, otherwise the crackels may disappear.
Crackling is a very easy way to give your project some character and it works really fantastically. After you finish with the project, you can rub beeswax over the whole surface and polish it with a rag. That is a different effect that you can try.


