Today, I went to Walmart looking for pens that may fit the Silhouette, and I found the Paper Mate Expressions. They come in a package of 8 with 6 different colors for only $1.50 (on sale; the original price was $1.80), not bad at all. I haven’t tried them yet, but I know the Paper Mate Eagle fits fine, and these have the same shape but more colors. I’m happy! I will try them this weekend and post about it.
Other pens that work are: LePlume, by Marvy Uchida and The Ultimate Glitter pen from American Crafts. If you know about any other please let me know.
Happy weekend!!!
If you want to print your photos or any image on fabric, there are different options:
- Use pre-treated fabric. They come in packages and usually are 8 1/2 by 11″. You can find these at any craft store.
- Use Iron-on Transfers. Remember to mirror your image when printing since the image is going to be flipped when applied to the fabric. The iron-on transfers have a backing paper attached that you will remove after the iron application.
- Print directly on the fabric using a printer with pigment ink. The pigment ink is not water soluble and will stay in your fabric. To make your own backing, iron on some freezer paper to the fabric before you print. Position the right side of the fabric on the ironing board, put the shiny side of the freezer paper over and then the iron on medium heat. That makes the two pieces into one, ready to print.
- Transfer the image printed on a transparency using liquid matte medium. Apply the medium to the fabric using a brush or a foam brush. Don’t saturate the fabric too much with the medium. Position the printed side of the transparency over the fabric and burnish with a bone folder or any other instrument that allows you to rub the transparency. When you see the image transferred, peel it back and enjoy the results. Remember the transferred image is going to look broken in some places. Also, you can use water instead of the medium. If you use water, spray the water to the transparency before position it on the fabric. Then, rub the surface to transfer.
Just remember to use a high quality printed image to transfer and to work on a sturdy surface that will allow you to burnish the image.
Tags: how to print on fabric
MATERIALS
- Black and white or color copy from an inkjet printer
- Heavyweight photo Matte paper or Great White Imaging and Photo Paper Matte Finish
- Golden Soft Gel Matte medium or Golden Fluid Matte Medium
- Soft brush or foam brush
- Bone folder or brayer
INSTRUCTIONS
- Print your image using an inkjet printer and setting your printing options to best print. If you want to transfer text, print it using the mirror image option.
- Position the image face up. Using a brush, coat the image with the medium, until it is totally covered. Clamp the papers together to avoid misplacement.
- Place the image on the surface to transfer. Press firmly over the image onto the paper with your hand. Then, roll the brayer or use a bone folder to press the image even more.
- Peel the paper back to check if the entire image had transferred.
- Burnish again the areas that didn’t transfer.
- Pull the paper off when the transfer is completed.
NOTES
- Use 3M Transparencies to print on. Follow the same process as for the paper.
- Use hand sanitizer like Purell to cover the paper where your want to make the transfer. Place the image on top and roll the brayer over to transfer.
Tags: image transfer
If you are creating a design that involves text, you may be working on your graphic and then want to change something from within the text.
Instead of changing tools from the toolbox, just go to your Layers palette and double-click on the T icon of the text layer that you want to modify. Your text is going to be selected and ready to format.
In case that you want to change the font of your text, once it is selected, click on the font name to highlight it (but don’t click on the drop-down arrow). Then, using the up or down arrow keys from your keyboard, move up or down to see the changes applied to the selected text. This is a very time-saving tip, since you don’t have to click on each font name but just move around with the arrow keys.
Talking about the arrow keys, in order to go to the beginning of the text, you can use the left arrow key. To go to the end, use the right arrow key. In order to do any of these, you need the text highlighted.
I hope these tips are useful for you. Simple techniques can save time.
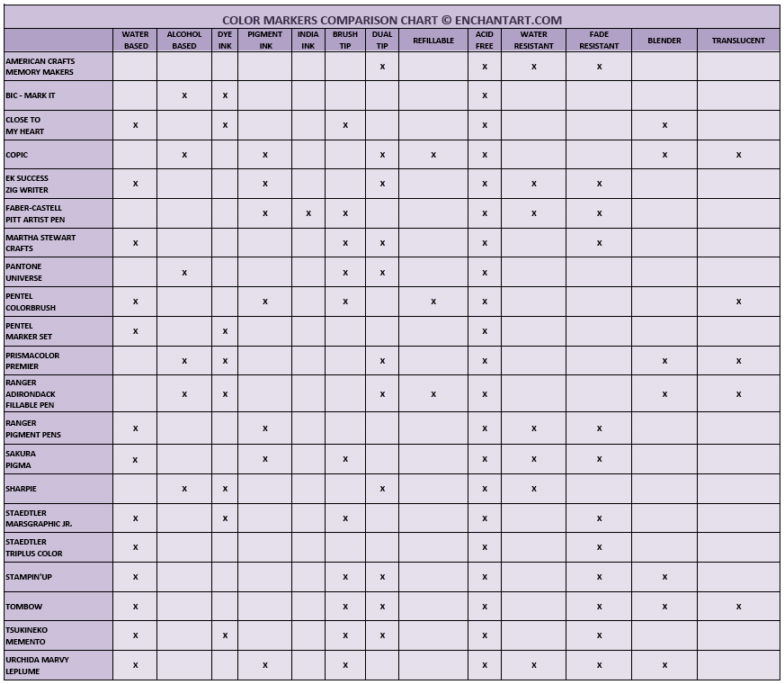
I’m very happy to share this chart with you . It was difficult to get all the information since even the websites of the manufacturers didn’t have it. I researched and came out with this chart. Please let me know if you have more information and I will update it.
You can click on the chart below to see it full size. Also, there is a PDF version if you want to print it or save it to your computer for future references.
Click here to see the PDF file.
If you have a Stampin’ Up blender pen, you have probably noticed that they can get empty fast. One way to use it more and help the environment by extending the life of the pen is to refill it with a homemade recipe:
- 2 teaspoons of glycerin
- 4 teaspoons of distilled water
- 1/4 teaspoon of rubbing alcohol
Mix all these ingredients and using a dropper, add the mixture into the barrel of the pen.
Sometimes when using a brush, you want Photoshop to ramdomly change the size of the brush while using it. The best way to do this is by using Shape Dynamics:
- Open Photoshop.
- Create a new document (File, New).
- From the Toolbox, choose the Brush tool.
- From the Menu toolbar, choose Window, Brushes.
- The Brushes window opens. Click on the word Shape Dynamics to select it, and open the options for the dynamics.
- To change the smoothness of the brush while painting with it, move the Size Jitter slider. The more Jitter, the less regular the size of the shapes.
- Minimum Diameter is going to specify the smallest size of the brush that you are going to use.
- Angle Jitter controls how much you want the image to rotate while using the brush.
- The Roundness Jitter controls how round you want the brush to perform. You can change the Minimum Roundness as well.
Playing with Shape Dynamics can be so much fun, and it’s an easy way to bring more interest when repeating a shape.
Tags: how to use the brush in photoshop, photoshop tutorial, Shape dynamics
Have you heard about the Angel Policy that is available to the stamps users? I will explain this, since you have to protect yourself from future complaints or even legal actions from the makers of rubber and acrylic stamps:
- According to many manufacturers, you buy a stamp but you are not allowed to use it for business purposes, only for personal use. For example, you can’t make cards with the stamp and sell them. That sounds very limiting to me; I like to share my designs freely and I like software like Inkscape that is totally free. I understand that they don’t want you to make another stamp with the same design or make molds using their stamps, but not to use it for your business…I don’t agree.
- Some companies have the Angel Policy and the Limited Angel policy for their stamps. You can make and sell your creations with none or some restrictions and regulations if the company agrees. For example, you may be limited to produce no more than 20 pieces using the same stamp, or you may not be allowed to sell your product online. Another regulation could be that you create the final product by hand or that you state that you used a stamp from a certain company (i.e. give them the credit).
- Sometimes, one company has different lines of stamps with different policies for each.
- Some companies require a registration fee prior to using the stamp.
- Read the entire company’s angel policy, not just the title. You may be surprised by the small print.
- The limitations of using rubbing stamps are confusing, since you have to research before you buy a stamp if you have in mind selling the final product.
- As for me, I don’t support restrictions to artists and their right to earn some money out of their work. All these regulations only add stress and fear for some crafters to use stamps. Necessary? I don’t see the reason for such protectiveness as long as you don’t step on the right of other artists by directly copying their work.
- What do you think, my friend?
Tags: angel policy
Here is the Cinch, a new binding machine like the Bind-it-All (BIA). This one looks more solid than the BIA, would takes more space on your table but is more stable. Also, it is easier to operate. The regular price is $100. Now, Enchant Art is selling it at spectacular price $85 if you insert the coupon code CINCH4U at checkout. Don’t miss the opportunity to bind your own books.
The Cinch binds your project in 3 steps:
Step 1) Punch holes using the Punch and Cinching Lever with rubber cushioned handle and smooth pressing motion.
Step 2) Thread sheets
Step 3) Cinch wire, and your book is done!
- Punch perfect holes without measuring
- Round holes. You can use regular metal or rubber rings. Also you can use the coils from the BIA
- Projects lay flat while punching
- Punches any length
- Punch up to 20 sheets of copy paper at once.
- Sliding Measurements Guide centers holes in inches and centimeters up to 13″
- Customize Hole Punching Knobs allow holes to be punched in any configuration
- Instructions and Charts printed on the base of the tool
- Handle Clip holds the handle down for storage and travel
Give it a try. It’s a really cool machine and the most that I like it’s how sturdy it is.
I received some news from Craftwell through their newsletter that I want to pass to you. Also, I’m including more details of more information about the eCraft:
ABOUT THE SOFTWARE: The eCraft is going to use the eCraftshop and the eCraftshop Pro. All models of the eCraft are going to be compatible with both versions.
- The eCraftshop Basic ($69.99) is going to be included with the machine without extra cost for a limited time; this is like an introductory offer. Also, you will recieve the USB cable that would allow you to connect the machine with your computer. Remember that you don’t need a computer to make the eCraft cut the images from the SD cards. These are the Basic Features of the eCraftshop:
* Customize artwork from SD Image Cards that you’ve purchased in order to make it your own
* Using a virtual cutting grid, manipulate basic shapes from our palate and images from your library
* Shadow, weld, rotate, stretch, flip, nudge, kern, and more
* View the entire eCraft library of all the latest SD Image Cards before purchasing them
* Easily download images to your library from eCraftCentral to cut with the eCraft - The eCraftshop Pro ($159.99 – not yet available) which has all the same features as eCraftshop Basic, plus:
* Create new images on a virtual cutting grid using the Craftwell design tools
* Utilize all True Type Fonts on your computer
* Import SVG images from other design programs to cut with your eCraft (you’ll need the Pro if you want to import your SVG images or create your own)
The eCraftshop software will be available as an application for the iPhone, iTouch or iPad for $19.99.
Features:
- Create a new design or make changes to an existing one on the go
- Access eCraftcentral.com to purchase images from the eCraft library or sell your designs
eCraftcentral is a web-based community where you can purchase images and even upload and sell your own. I understand that the community will be able to rate the files, so you know which ones are the best for cutting.
ABOUT THE MACHINES: There are different models for the eCraft machines:
- The Basic (white/magenta/periwinkle) has a 2.8″ B&W screen and comes with 1 SD card. ($259)
- The Deluxe (black) has a 2.8″ Color screen and comes with 2 SD cards. The only difference with the Basic is the color screen and the additional SD card. ($349)
- The Professional (silver) has a 3.5″ B&W screen, 2 SD cards and an industrial motor. This motor is not going to have more power than the others, but it is intended for using the machine for long periods of time without overheating. ($399)
All the machines are going to be equipped with a heavy-duty motor, the roller and the paper tray.
The screen may be an important factor to consider since from it you are going to be able to select the image or images you want to cut, adjust the size, choose shadow and how many images you need to cut.
WHAT ABOUT THE ACCESORIES: Craftwell will bring many accessories to accompany the eCraft. Among them:
- Ball-point Pens (Black, Primary, Pastel, Glitter and White/Gold/Silver) that will come in packs of five from $9.99- $11.99. The eCraft can draw and/or cut.
- 12″ x 120″ rolls of paper ($16.99) and vinyl ($19.99)
- SD Cards with images. Currently they have 11 SD Cards, each with over 150 images. ($39.99 – $49.99)
- Replacement blades $17.99 10/PK $29.99 20/PK
- Paper/Vinyl Rolls, Travel Tote Bags, Travel Bag w/ Wheels, Image Card Caddy, Battery Pack (lasts up to 4 hours)
AVAILABILITY: The machines are not going to be available to retailers until March. Now, they are doing pre-orders only. About the warranty, they offer 1-year warranty for their machines.
OTHER OBSERVATIONS:
The eCraft is able to cut materials under 1mm of thickness. I will try many materials and confirm this. Also, they are going to include in the SD card a journaling type of font.
I hope this information is useful for you. If you have any comments, please let me know.


