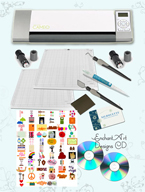
If you can’t see your images in the Silhouette Library on your C: drive, these are the instructions from the Silhouette Support Team:
1. Open the Silhouette software and go to the “Help” menu to select “About” and check what version of the software you are running.
-If you are not running Version 5.10 or higher:
a. Close the Silhouette software completely.
b. Get the latest software and install it from:
http://www.silhouettemachine.com/software.aspx.
c. Once finished installing, open the Silhouette software from your desktop icon. Continue with Step 2 below.
-If you are already running Version 5.10 or higher and have had problems downloading since the update:
a. Close the Silhouette software completely.
b. Go to C:\Program Files\ROBO Master\Templates and delete the file called QKRegister.config (it may already be deleted).
c. Download qkregister.exe by clicking on the following link: http://www.silhouettemachine.com/support/programs/qkregister.exe. Save this file to C:\Program Files\ROBO Master\Templates (overwrite if prompted).
d. Once finished with these steps, open the Silhouette software from your desktop icon. Continue with Step 2.
2. Once you have opened the Silhouette software, click on the “Purchase Online” button.
3. Log into your account.
4. Go to the “My Account” options and visit the “My Download History” link.
5. Select the order number that you need to recover and click on the “Recover Order” button.
6. Once you have submitted your password, your images from the selected order will be downloaded to your library. Once you have performed these steps, you should no longer experience further issues with downloading any additional images and your purchased images should show up correctly in your library.
Tags: Quickutz Silhouette
Here are the pictures of some of my projects. They were so much fun to create and share.
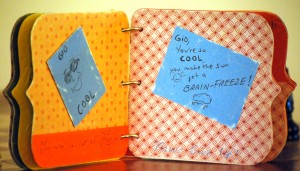
This is my Bracket Mini-Album, which I made using the Silhouette and the file that I shared with you previously. Since the Silhouette can’t cut chipboard, I glued two pages together to make this album sturdier.

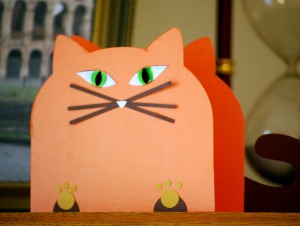
This cute cat card was made using the cat file that I created. My son liked it and that was my best reward.
If you have the Silhouette, you can download the files for both projects by going to the “GSD, SVG Files” section of my blog.
If you want these designs but don’t have any digital cutter, let me know and I can convert them into the PDF format; you would then be able to print them and then cut them by hand.
Take care and happy crafting!
Tags: die cut machine, handmade cards
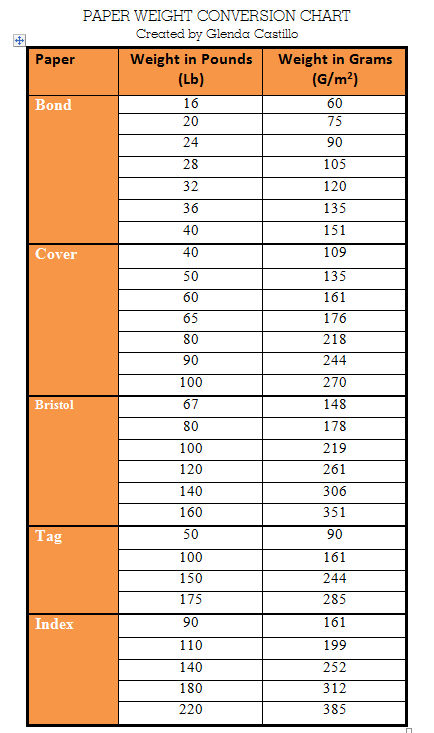
Understanding paper weight has been a real challenge for many. I had to research and here are my results:
- There are different categories of papers:
Ultralight weight paper: From 20 to 45 gr. Ex: Glassine paper.
Light weight paper: From 20 to 45 gr. Ex: Bond paper, origami paper.
Medium weight paper: From 85 to 160 gr. This is also known as Text weight paper. Ex: resume papers.
Heavy weight paper: From 160 to 300 or + gr. This includes 65 lb Cover paper, 90 lb watercolor paper, Tag Stock, Index. - When you buy paper, see if this paper belongs to a certain category: Bond, Cover, Bristol, Tag or Index. Then, look for its weight in lb. or gr. Here is a table with the equivalence in pounds and grams. You can also download it and print it for your information.
Click here to download a PDF file of the chart.
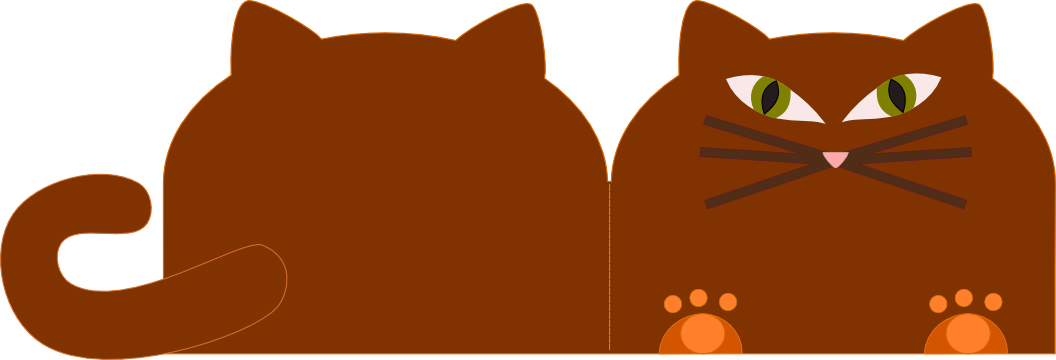
I made this cat for my older son, who is a cat lover. Enjoy the file. It’s free for your personal use. I cut it using Inkscape but I converted it to a .gsd file also. Separating the front from the back you can have a very interesting mini book, just make some holes for rings or ribbon.
Also, you don’t have to cut all the pieces. You can draw the eyes closed or add a mouth. Up to you! By the way, my son really liked it!
Cat Card
Click here to download the file!
Tags: Free gsd svg file
This is a very easy process for creating your own marbleized paper using chalk. Follow these steps:
- Put some water in a wide but shallow bowl.
- Using a craft knife or any knife, scrape some chalk in the bowl.
- The chalk is going to float on the water. Using your knife, very slowly swirl the chalk to create a nice pattern. Don’t overdo this.
- Now, take your paper and slowly introduce it to the bowl until the chalk covers the surface of it.
- Take out the paper and allow it to dry.
- If the paper gets curled, iron it or just put it under a heavy book or inside your telephone book (anyway, I don’t use my phone book for anything else).
- Now you have your unique paper to use as background for cards or to create pages for journals. Up to you!
Now there’s a new way that you can access this blog: by entering blog.enchantart.com in the address bar of your browser.
The web address of this blog hasn’t changed, so you can still access it through the link we’ve always had: enchantart.com/blog. If you have Favorites or Bookmarks to this link, they will continue to work.
We just thought we would add that additional address to make it easy for you to remember and type. Both addresses get you here to this blog.
By the way, we’ve also added a few more of Glenda’s images to the rotating photographs in the top right part of this blog’s header. (They rotate by changing the image every time you bring up the page in your browser.) Every image displayed there is a photograph taken and enhanced digitally by Glenda using Photoshop.
Tags: blog, web address
This is a very useful chart if you make your own cards and even cut your own envelopes. I just love to have this handy and I hope you can use it too.
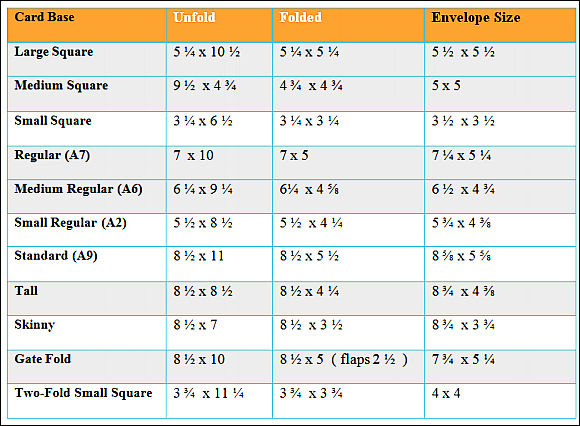
If you want to download this chart as a .pdf file so you can print it really nice, then click here.
Tags: Measuring cards and envelopes, size chart for greeting cards and envelopes
You may want to cut your own envelopes and to have them ready, just like the ones you buy, with the dried glue on one edge so you just have to lick it and close. I’m going to show you how to make your own envelope glue. This is the recipe:
Mix three parts of white glue, like Elmers with one part white vinegar. Very easy. You can even keep this mixture in a closed container for future use.
Now, using a brush, apply this mixture to the edge of the envelope and let it dry. You may want to apply a second coat.
The envelopes are going to be ready to seal, no mess!
For many reasons, you want to know how to access some tools and commands using your keyboard. I like to work fast and I use many shortcuts. Here are some of the most common:
For Text:
T: If you want to choose the Text tool.
Ctrl+B Apply a bold style to selected text.
Ctrl+I Apply a italics style to selected text.
For Objects:
Pg Up or Pg Dn: If you have more than one object in the same layer, use Pg Up to move the selected object on top of the others or Pg Dn to move it down.
+ or – : To zoom in or out.
Letter H and V: Press letter H if you want to rotate your object Horizontally or V to rotate it Vertically.
Letter B: If you have any tool selected and want to choose the Bezier or pen tool, just press B.
Letter N and S: If you want to choose the Edit Nodes tool, press N. If you want to toggle to the Select tool, press S or the Spacebar.
Letter G: To access the Gradient tool.
Those are enough for now. Practice and try to memorize the different shortcuts available.
I just want to pass you on the news that Silhouette is going to be a separate company from now on. Here is an excerpt from the newsletter they sent me:

“We’ve recently made some big changes with the Silhouette product line that you will be excited about. As you may know Silhouette has always been a brand of QuicKutz, Inc. and has been part of the QuicKutz family of die cutting products. Recently, however, we’ve formed a completely new company for the Silhouette product line called Silhouette America, Inc. This initiative was made with the intention of enabling both QuicKutz and Silhouette to sharpen their focus on two similar products that are growing in very different ways. We fully expect to maintain the same quality of service you’ve received in the past with both companies moving forward and you, as customers, will still interact with the same customer support you’ve grown to know and love. The only major change that you should notice moving forward is that we now have a new phone number and customer support email address:
(800) 859-8243
support@silhouetteamerica.com


