Enchant Art have wonderful customers from many places in the world. Some of them had asked me how to cut a graphic using their Silhouette. So, I wrote this tutorial in English and in Spanish to make everybody happy.
Enchant Art tiene clientes de muchos lugares del mundo. Algunos de ellos me han preguntado como cortar sus graficos usando su maquina Silhouette. Entonce, he escrito este tutorial en Español tambien para que todos esten contentos.
SILHOUETTE PRINT AND CUT TUTORIAL
If you have a Silhouette and would like to learn how to use those beautiful graphics that you find on the Internet or that you have on your computer, here is the tutorial for today. I used two different graphics in this tutorial just to show you that you can use any graphic to print and cut:
1. First, open the Silhouette Studio program.
2. Make sure your page on the screen is Letter size, since you will be using your printer to do the printing part. See this graphic as a guide:
3. Click on File, Open to look for a graphic saved on your computer. Click on the Files of Type box and choose the correct extension for the graphic that you intend to print. This graphic needs to be a .jpeg. ,png, .bmp. or .tiff file type.
4. Once the graphic is on the screen, resize it and position it wherever you want it to print on the page.

5. This graphic is not ready yet to be cut. You need to trace it using the Tracing tool in the software. In order to do this, click on the Trace icon. Then click the “Select Trace Area” button. Select your graphic by clicking in one corner outside the graphic; keeping the mouse button pressed, cover the whole graphic with the box.

6. In the Trace Settings, make sure the High and the Low Pass Filter boxes are unchecked.
7. Move the Threshold slider to the right, until you see the inside of the graphic covered by yellow. It doesn’t have to cover the whole graphic but as much as you can.

8. Then, click on Trace Outer Edge. Now, you are going to see the graphic with a red line around it. This is the cutting line.
9. Next, we are going to add registration marks to the page. The Silhouette uses an optical eye to “see” the registration marks added to the page by the software. In order to add these registration marks, click on the icon at the upper right of your screen that has 3 lines and click to check the Show Reg Marks option.

10. Click on File, Print and print your paper using your printer. I like to print using the best quality option and making sure I choose the right kind of paper (photo paper, cardstock, etc.)
11. Once the graphic is printed, you’ll see the paper also printed the registration marks. Place the printed paper on the Silhouette mat and feed it to your machine as you do with a blank paper.
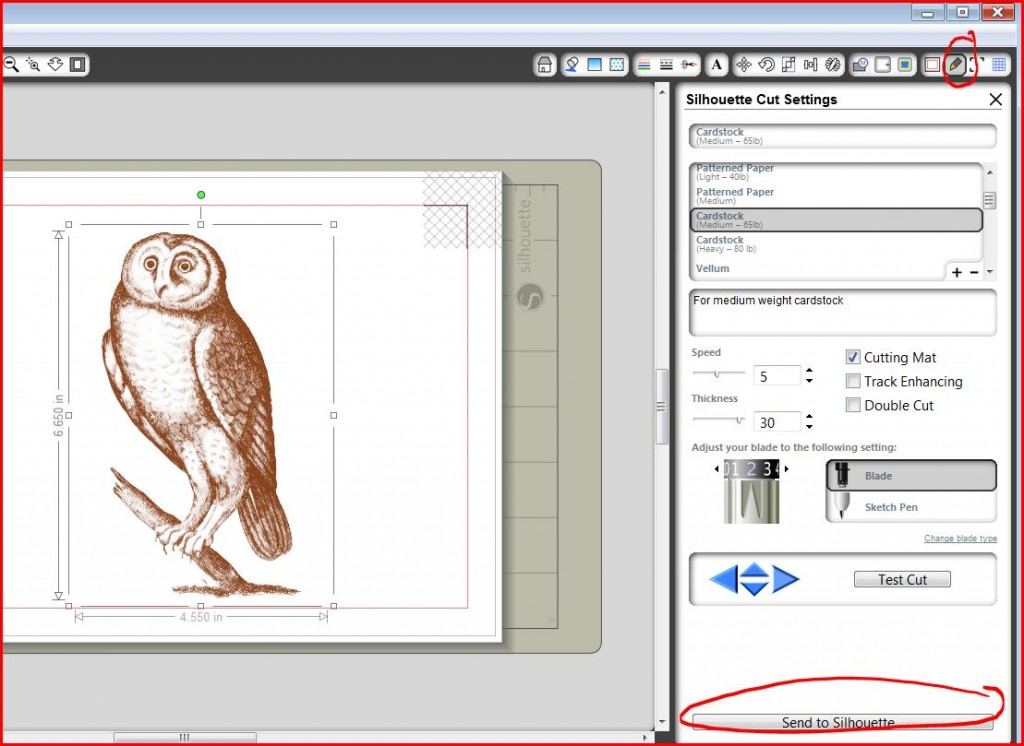
12. Choose the icon with a blade to start the cutting part. Choose also the right settings for paper or cardstock and the speed of cutting (I always cut in low speed, 2 or 3) and click on Send to Silhouette:
13. The Silhouette is going to scan the page and look for the registration marks in it. Once it finds them, it will cut around your graphic.
Ready! If you have any question, please ask in this blog or email me at glenda@enchantart.com. If you are interested to buy a Silhouette Cameo, please consider our store www.enchantart.com.
Este es el tutorial en español:
TUTOTIAL DE COMO IMPRIMIR Y CORTAR USANDO EL SILHOUETTE
Si ya tiene un Silhouette Cameo, ha realizado cortes normales, pero ahora quisiera conocer más de la función de imprimir y cortar con su máquina, este es el tutorial que le enseñara como hacerlo. Usted aprenderá a cómo utilizar esos gráficos hermosos que encuentra en el Internet o que tiene en tu ordenador. Voy a utilizar dos diferentes graficos para darles una mejor idea de todo lo que puede utilizar con su maquina. Aquí está el tutorial de hoy:
- En primer lugar, abra el programa Silhouette Studio, que vino con su máquina.
- Asegúrese de que su página en la pantalla es tamaño carta, ya que va a utilizar su impresora para hacer la parte de impresión. Ver este gráfico como guía:

- Haga clic en File, Open, esto es “Archivo, Abrir” – para buscar un gráfico que haya grabado en su ordenador. Haga clic en el cuadro que se refiere al tipo de archivo, Files of Typey seleccione la extensión correcta para el gráfico que desea imprimir. Este gráfico debe ser un .jpeg. , png, BMP. o tipo de archivo .tiff.
- Una vez que tenga el grafico en la pantalla, póngalo del tamaño deseado y en el lugar que usted lo desee imprimir en la página.

- Este gráfico no está listo aún para ser cortado. Necesita delinearlo haciendo uso de la herramienta Tracing del programa. Para hacer esto, haga un click en el icono de Trace. Haga clic en el botón Select Trace Area “Seleccionar área de seguimiento”. Seleccione el gráfico haciendo clic en una esquina fuera del gráfico manteniendo presionado el botón del ratón hasta sombrear todo el grafico.

- En la configuración de seguimiento, Trace Settings, asegúrese de que las casillas de filtro de High y de Low Pass esten desactivadas. Esto es que no hayan vistos en ninguna de ellas.
- Mueva el Threshold a la derecha, hasta que vea el interior del gráfico cubierto por un color amarillo. No tiene que cubrir el total del gráfico pero tanto como se pueda.

- A continuación, haga clic en Trace Outer Edge. Ahora, va a ver el gráfico con una línea roja alrededor del mismo. Esa línea es la línea de corte.

- A continuación, vamos a agregar marcas de registro (registration marks) a la página. Su Silhouette utiliza un ojo óptico para “ver” las marcas de registro que agrega a la página por medio del software. Para agregar estas marcas de registro, haga clic en el icono situado en la parte superior derecha de la pantalla que tiene 3 líneas; haga clic para activar la opción Show Reg Marks“Mostrar marcas de Registro”.

- Haga clic en File, Print, e imprima el grafico en el papel utilizando su impresora regular. Personalmente, me gusta imprimir usando la mejor opción de calidad; asi también asegúrese de elegir el tipo correcto de papel (papel fotográfico, cartulina, etc.).
- Una vez que se imprime el gráfico, verá que el papel impreso también contiene las marcas de registro (tres marcas). Ahora, coloque el papel impreso en el mat del Silhouette y aliméntela al equipo como lo haría con un papel en blanco.
- Seleccione el icono con una cuchilla para iniciar la parte de Corte. También elija la configuración correcta de papel o cartulina y la velocidad de corte (siempre cortada en baja velocidad, 2 o 3) y haga clic para enviar a Silhouette, Send to Silhouette:

- El Silhouette va a analizar la página y buscar las marcas de registro en ella. Una vez que las detecte, cortará alrededor del gráfico.
- Listo! Si tiene alguna pregunta o comentario, escribame en este blog o envieme un email a glenda@enchantart.com. Si desea adquirir una maquina Silhouette Cameo, considere nuestra tienda www.enchantart.com
Tags: print and cut with silhouette cameo, tutorial de como imprimir y cortar con el silhouette cameo, tutorial silhouette


