I admit it. I gave in to the all-popular 3M ATG 714! Everybody loves it and I will also, I know that. Why? Because I’m soooo tired of gluing my photos and after a few days, they fall apart. Not just my pictures, but cards and other projects. I wanted a double-sided tape but I just can’t spend on the small glue gliders that don’t work well.
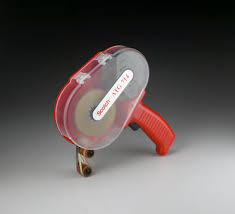
3M ATG 714
So, after so much of deliberation, I decided to buy it. Believe me, it wasn’t easy. I had to consider so much before making the investment. I’m very “economical” and I don’t like to have things that I don’t really need. These are some of the things that I considered:
- cost, not just the initial cost but the tape refills
- space that it’s going to take in my house
- right fitting to my small hands
I figured out that the 714 is big but not heavy, so I could handle it. Since it’s big, I’m not going to have any trouble finding it. It has a trigger, so I think that can give some control over the projects. It uses a 1/4 inch tape; that’s good for making cards or attaching photos.
Now, about the cost. The 714 is not cheap, at least for me. You make an initial investment but the tape is very inexpensive and the most important factor for me: it works! After I decided to buy it, it was the time to compare prices; after hours and hours of searching and researching, I found the best places. I want to let you know the ones that I considered the best prices:
- cropandstick $41.60 + 10.74 SH
- inkognitoart $40 + 5.00SH
- framingsupplies $41,69 + 7.63SH
- findtape $56.23 + 8.25 SH
- apakinc $41.29 + 8.00 SH
- ebay $47 + 7.85 SH
- armel $54
It may differ for your zip code because of the shipping, but those were the prices for me; I live in Florida.
But, that’s not all. You need to buy the tape. Depending on the kind of projects that you are going to do, you need to buy tape that is acid free or not:
3M 987 Economy, not acid free, 60 yards, approx. $3.50
3M 908 Gold, acid free, 36 yards, approx. $3.50
JVCC 7502, acid free, approx. $2.00
Conclusion: I bought the 714 plus the rolls all in one place…..that was framingsupplies. Why? Because the 714 plus 3 rolls of the gold 3M and SH was altogether $59.79.
Compared to cropandstick, the same deal was $62.84 and from apakinc was $61.93. Addicionally, I read great comments about framingsupplies.
I wanted the acid free tape and framingsupplies doesn’t have the cheaper JVCC, so I bought the 3M Gold for now. When I’ll need more tape I may go for the JVCC 7502, which is acid free also, but much cheaper. Findtape sells it for $1.99 plus $8.25 SH; amazon for $2.09 plus $7.00SH. Since S&H is high, it made more sense buying the tape and the gun together.
I hope this article will help you and save some hours or days of researching. If you have any question, let me know. I will be posting when I get my 714 and open the box. Have a great day!

There are so many Print and Cut files in the QK online store now and many people that are confused how to do the printing and cutting of these files. This tutorial is not just for the QK files, but also if you want to print and cut your own creations.
These are the steps:
- Start the ROBO Master program.
- Click on File, New. This is going to open a new window, where you are going to specify the size and orientation of your paper. Choose the Letter size. Also, click on the box next to Use Registration Marks. This is going to put a check mark in the box. Click OK. If you have an image already opened, then go to Edit, Registration Marks Settings and put a check on the Use Registration Marks option, then click OK
- Now, you are in your main window and you will be able to see three registration marks at the corners of the page. Also, you are going to see a little bit of a grid at the background.
- From My Library, click on the P&C image that you want to use. You’ll be getting a blue box; position it on your document and click. Now, you are able to see the image.
- Once the image is inserted, you can resize it using the squares on the bounding box or by right-clicking on the image and choosing Position Settings, Size.
- Click on your image and without letting go click on the mouse, then position it wherever you want within the registration marks; don’t go beyond them. In other words, don’t touch the grid with your design.
- Now it’s time to print your design/s with your regular printer. Go to File, Output Settings, on Printer choose your home printer. Then click on Properties and use a high quality setting so you get those vibrant colors. Print.
- Take the paper from the printer and check if the registrations marks are nice and clear. Your Silhouette is going to read these registration marks.
- Position your printed paper on the mat that came with the Silhouette. Press the paper on the mat so it sticks to it. There are going to be some arrows and a message “Feed this side first.” That’s the end that goes first on the Silhouette.
- Roll the mat in the Silhouette, but not as much as you do when you are just cutting (this is important). Adjust your settings as you do with you other cuttings and Cut. Make sure Search Registration Marks has the check mark.
Tips:
- Avoid using textured paper.
- When you cut your design, try to have your room with low light.
- You are not restricted to print one image, you can fit many of the same or different in one sheet of paper.
- You may want to use photo paper or presentation paper rather than regular cardstock. (For example: Epson Ultra Premium Presentation Paper Matte -50 sheets for $11; or Epson Photo Quality Ink Jet Paper Matte coated.)
- Use light color paper to print, so the registration marks are very visible.
- Make sure your document size is 8.5 by 11 inches.
- A way to “force” the optical eye of the Silhouette to read the registration marks is to position the blade manually on top of one of them.

A very straightforward way of rounding the corners of a photo or graphic is the following:
- In the Toolbox, choose the Rounded Rectangle Tool (click on the normal rectangle tool in order to see more options and find the rounded rectangle).
- Now, from the toolbar above, click on the Paths icon. From the same toolbar, change the Radius to 80 pixels (experiment with your numbers here; this is going to change the roundness of your rectangle).
- At this point, you can start drawing your rounded rectangle on top and inside of your picture.
- From the Paths Palette, click on the double arrow to have access to the sub menu. Choose Make Selection, OK
- Click on Select, Inverse.
- Hit the Delete key.
- Now you have your picture or graphic with rounded corners.
Tags: how to make a picture with rounded corners, photoshop, photoshop tips and techniques
There are different ways to change your color photos and convert them to black and white. If you have Photoshop, the easiest way would be to convert the photo to Grayscale. If you opt for this method, I recommend to make a Duplicate of your picture (Image, Duplicate) and work on that. These are some of the ways to achieve the black and white:
- Go to Image, Mode and choose Grayscale. A dialog box will open asking if you want to discard all the color information. Click OK.
- Another way that gives you more control is theChannel Mixer. Go into Image, Adjustments, Channel Mixer. You are going to have a new window; there check the Monochrome box. After you make the image monochromatic, you can adjust the level of Red, Green, and Blue channels of the image using the slider for each one. Experiment with different levels.Go to Image, Mode and choose Grayscale before saving it.
- If you don’t want to use the Channel Mixer, then you can try the Lab conversion. Go to Image, Mode, Lab Color. This is going to separate the image into a Lightness channel, and two Hue/Saturation Channels called a and b. Click on the Channels palette and delete channels a and b. Now, if you notice, you are left with Alpha 1 and Alpha 2; delete Alpha 2. Go to Image, Mode and choose Grayscale before saving it.
- Also, you can go to the Channels Palette and click on the eye of all the different channels in order to disable them. Then click only on the Red and see how your picture changes. Deselect red and click only on the Blue…. you have the idea. When you find the one that you like, convert your picture to Grayscale and save it.
Try the different methods that I’m showing here, just to practice, since every picture is different. Also, if you know how to apply masks, create different layers using different channels and that will give your picture a more refined finish.
Tags: converting color photos to black and white, photoshop, photoshop tutorials
Imagine you can make a background soft and dreamy after you print your photos in your printer. …
Yes, you can do it and it’s very easy!
First, print your photograph using regular photo paper. Then, crumple a sheet of baby wipes (that is not too wet) and blot the photo using soft and semi-circular touches. Also, you can roll the baby wipe covering small spaces at a time.
I recommend to start from the very edges of the photo. Play with it and apply more pressure for a more blurry effect and less for a more subtle effect. Don’t take out too much of the ink unless you want a grungy effect. The best is to go little by little until you reach your goal.
This technique works really well with background landscapes.
OK, I’ve been waiting so much for the new release of Inkscape. I use this program almost everyday and like it so much. I’m very happy to be able to download the new release. This is not the final release but the prerelease. I’ll keep you posted!
The link to Inkscape website is http://www.inkscape.org
Tags: Inkscape new release
Once you have your image/s in your computer, use Photoshop ‘s File Browser. The File Browser is going to allow you to see all the pictures that you have, including the RAW files.
Now, you can double-click on any of the thumbnails of your RAW files. This is going to give you a larger preview of the image and the different options to adjust the image.
The fun begins and you can change almost anything since you have a large file with many details in it. Enjoy your RAW images!
Tags: opening raw images using photoshop, photoshop, raw images
A RAW image is a digital negative and Photoshop’s Camera RAW plug-in is the digital darkroom. This plug-in gives you all the control over your digital negative. You can change the sharpness, color, balance and more using the RAW plug-in.
The disadvantages of using RAW images are:
-
The size of the file. It’s going to be much larger that a JPEG or TIFF file.
-
Time. You need to spend time to modify your picture.
-
You need the plug-in or a converter supplied by your digital camera’s manufacturer.
Now, with many digital cameras you have the option to get RAW, RAW and JPEG or TIFF. You choose!
Tags: photoshop and raw images, RAW image, what is a raw image
I think word books are so cool. These are books that you can make by cutting each page using a different letter every time. For example, a word book that spells LOVE: one page is the L, another O, another V and the last E. When you finish with your word book, you are able to see all the letters because the pages get bigger and bigger.

Interesting, isn’t it? I had to try to make one. I use Inkscape to create it and then my Silhouette to cut the card stock. I cut two of the same letter every time so I can glue them for a sturdier page and then I proceed to glue pieces of paper, photos or other embellishments.
This is the process using Inkscape:
- Using the Rectangle tool from the toolbox, draw a rectangle. Click on the Selection tool and click on the rectangle. Change the measurements of your rectangle to 1 inch for Width by 4 inches for Length.
- On the menu toolbar, choose Path, Object to Path. This is going to be our base rectangle; we are going to be attaching letters to rectangles.
- Select Edit, Copy and then Edit, Paste to get another rectangle. We are going to use the new one later.
- Select the Text tool fron the toolbox and type the letter L. You can use any font that you like but I prefer something thick with no adornments like Arial.
- Choose the Selection tool and click on the letter to select it. Now, do the same as you did for the rectangle, go to Path, Object to Path.
- Locking the proportions (click on the little yellow lock), change the Length to 4 inches.
- Move your letter next to the original rectangle overlapping a little. Press the Shift key and click on the rectangle so both shapes are selected. Choose Object, Align and Distribute. In the Align area, choose the 3rd icon of the 2nd row (Center on Horizontal Axis) so both shapes are perfectly aligned with each other.
- Now, choose Path, Union and you are going to have one shape and the first page of the book.
- In order to create the other pages, you are going to do the same with the other letters but changing the size of the base rectangle. Remember the one that we copied and pasted; we are going to repeat the copy and paste so we keep this one.
- With a new rectangle selected we are going to change the width, just by dragging it horizontally until it reaches less than the width of the letter that you just finished.
- Type the letter O and do the same as you did with letter L (Path, Object to Path). But, with the letter O you are going to do something additional, since this one has a hole in the center. With the letter O selected, choose Path, Break Apart. Now, click to select the letter and holding down the Shift key, click again in the center of the O to select the hole. Select Path, Difference and that is going to cut the center.
- Do the same as you did with the letter L following steps 7 and 8.
- Type letter V, repeat process with a wider rectangle. And lastly, the letter E.
- Now you have 4 pages, one bigger that the one before.
- You can cut them now or you can proof them.
- If you want to proof them, first I changed the Fill color for each page, just to make them different. Then, I change the position of the pages: click on the letter L and choose Object, Lower to Bottom. Do the same for O, V and E.
- Now, select all the pages using the Shift key. Choose Object, Align and Distribute and select the second icon from the first line and the third icon from the second line for Alignment.
- If any needs corrections, just drag it apart and make it wider or slimmer.
- Once you are happy with the pages, with the Selection tool, select all the pages and resize the project, since by now it’s bigger than your page background.
- Ready to cut or print? Wonderful; separate the pages again and you can save your project as DXF to import it to your digital cutter or just print them using your printer and cut them by hand.
- If you want your pages bigger, save each page in a separate file, L in one file, O in another, etc. and cut from those files individually.
- Once they are cut, you can make two holes on the left side of your pages, in order to bind your pages together with ribbon or metal rings.
Have fun decorating it!

Tags: Inkscape, make a word book, mini book, word books
You can save in many formats using Photoshop. Just go to Save As and choose the format of your choice depending of your need for layers or small file, etc. You have a lot to choose from. Here is the list of different file formats that you can save your document:
|
Format |
Extension |
What’s that? |
|
Photoshop |
.PSD |
The default Photoshop format. You keep all the layers intact. |
|
Bitmap |
.BMP |
Supports files containing up to 16 million colors. BMPs can be opened in Microsoft Paint. |
|
CompuServe GIF |
.GIF |
GIFs are common web file formats. |
|
Photoshop EPS |
.EPS |
Used mainly to print color images by a professional printer or photo lab. |
|
Photoshop DCS 1.0 |
.EPS |
Desktop Color Separation (DCS) files developed by Quark. |
|
Photoshop DCS 2.0 |
.EPS |
Desktop Color Separation (DCS) files developed by Quark with grayscale support. |
|
JPEG |
.JPG |
JPG files are also common web file formats. JPEGs retain all color information in an RGB image but compresses file size by selectively discarding data. |
|
PCX |
.PCX |
Designed for DOS PC Paintbrush. |
|
Photoshop PDF |
.PDF, .PDP |
PDF (Portable Document Format) files can be used to publish documents or images on the Internet. These file types can be opened in Adobe Reader. |
|
Photoshop RAW |
.RAW |
RAW files contain no extra data. Can be processed further for JPG or TIFF file formats. |
|
PICT File |
.PCT, .PICT |
PICT files are native to Macintosh computers. |
|
Pixar |
.PXR |
Used on Pixar workstations for 3D imagery. |
|
PNG |
.PNG |
PNGs support RGB, indexed color and grayscale imagery. Useful when you want to keep the transparency of a background. |
|
Scitex CT |
.SCT |
Scitex CT (Continuous Tone) format files are for use in conjunction with high-end professional printers. |
|
Targa |
.TGA, .VDA, .ICB, .VST |
Targa files are used for video software applications on the PC. |
|
TIFF |
.TIF, .TIFF |
TIFF (Tagged Image File Format) files are compatible with both PC and Macintosh systems. TIFFs are used primarily for color printing. |
Tags: file formats, photoshop, saving in different files using photoshop


